✓ Sourdough starter is a living culture of flour and water, fed regularly.
✓ It takes 7-14 days to establish a strong, active starter.
✓ Consistency in feeding and temperature are crucial for success.
✓ A healthy starter smells yeasty and tangy, with visible bubbles.
How It Works
1
Combine Flour & Water
Mix equal parts whole wheat or rye flour with unchlorinated water in a clean jar. This initiates the fermentation process.
2
Daily Feeding Schedule
Discard most of the starter and feed the remainder with fresh flour and water daily. This strengthens the yeast and bacteria.
3
Observe Activity
Look for consistent bubbling, rise, and fall after feeding. These are signs your starter is becoming active and ready to bake.
4
Maintain and Store
Once active, maintain your starter with regular feedings at room temperature or store in the fridge for less frequent feeding.
Understanding the Magic Behind Your Sourdough Starter
Photo: Natalia Olivera / Pexels
Embarking on the journey of how to make sourdough bread starter is more than just mixing flour and water; it's about cultivating a living, breathing ecosystem. At its heart, a sourdough starter is a wild yeast and bacteria culture. These microorganisms, naturally present in flour and in the air around us, are responsible for leavening your bread and imparting that distinctive tangy flavor. Unlike commercial yeast, which is a single strain, sourdough starter boasts a complex community of various yeasts (primarily *Saccharomyces cerevisiae* and *Candida humilis*) and lactic acid bacteria (LAB, such as *Lactobacillus sanfranciscensis*). This symbiotic relationship is what gives sourdough its unique characteristics, including its chewiness, crust, and longer shelf life.
The process begins by creating an environment where these beneficial microbes can thrive. Flour, particularly whole grain varieties like whole wheat or rye, provides the necessary nutrients for the yeast and bacteria to feed upon. Water, ideally unchlorinated, hydrates the flour and creates the medium for microbial growth. When you combine these two simple ingredients, you're essentially setting up a microbial buffet. Over several days, with consistent feeding and a stable temperature, the dominant strains of yeast and bacteria will multiply, outcompeting less desirable microorganisms. This fermentation process produces carbon dioxide, which creates the air pockets in your bread, and lactic and acetic acids, which contribute to the characteristic sour flavor. The beauty of a homemade starter is its individuality; each one develops its own unique microbial profile based on its environment, making every sourdough loaf a reflection of its origin. This foundational understanding is crucial before diving into the practical steps of creating your own fermented dough. It helps you appreciate the subtle changes and anticipate the needs of your nascent starter, guiding you towards a robust and reliable culture that will serve as the heart of all your sourdough baking adventures. Patience and observation are your best allies in this fascinating biological process, as you watch simple ingredients transform into a powerful leavening agent.
Gathering Your Essential Tools and Ingredients
Before you begin the exciting process of how to make sourdough bread starter, ensuring you have the right tools and ingredients is paramount to success. While the list is relatively short and simple, the quality and type of each component can significantly impact your starter's health and activity. First, let's talk about flour. For the initial stages, many experienced bakers recommend using a whole grain flour like whole wheat or rye. These flours are richer in nutrients and contain a higher concentration of wild yeasts and beneficial bacteria in their bran, giving your starter a stronger kickstart. While you can transition to unbleached all-purpose or bread flour later, starting with whole grain often leads to a more vigorous and active starter more quickly. Avoid bleached flours, as the bleaching process can strip away essential microbes and nutrients.
Next, water. This might seem trivial, but it's crucial. Tap water often contains chlorine or chloramines, which are disinfectants designed to kill microorganisms – precisely what you're trying to cultivate in your starter. Therefore, it's best to use filtered, distilled, or spring water. If you must use tap water, let it sit uncovered for at least 24 hours to allow the chlorine to dissipate. Chloramines are harder to remove this way, so filtered water is always the safer bet. Don't use hot water, as it can kill the yeast; aim for lukewarm (around 70-75°F or 21-24°C) or room temperature water.
For equipment, you'll need a clean, clear glass jar, preferably with a wide mouth, that can hold at least 1 quart (about 1 liter). Glass allows you to easily observe the activity of your starter. Avoid metal containers for long-term storage or mixing, as some metals can react with the acids in the starter, though stainless steel is generally fine. You'll also need a lid – not airtight, as your starter needs to breathe. A loose-fitting lid, a piece of plastic wrap, or a clean cloth secured with a rubber band will work perfectly. A kitchen scale is an absolute must. While some recipes provide volumetric measurements, weighing your flour and water ensures accuracy and consistency, which is vital for a healthy starter. Finally, a rubber spatula or wooden spoon for mixing and a thermometer to monitor ambient temperature can be helpful but are not strictly necessary if you're mindful of your kitchen's warmth. Having these items ready will set you up for a smooth and successful start to your sourdough journey.
The Day-by-Day Journey: Cultivating Your Sourdough Starter
Creating a robust sourdough starter is a process that unfolds over several days, requiring patience, consistency, and observation. Here’s a detailed day-by-day guide on how to make sourdough bread starter:
**Day 1: The Beginning**
In a clean, clear glass jar, combine 50 grams (approximately 1/4 cup) whole wheat or rye flour with 50 grams (approximately 1/4 cup) lukewarm unchlorinated water. Mix thoroughly with a rubber spatula or wooden spoon until no dry flour remains and the mixture is smooth. It should have the consistency of a thick batter. Scrape down the sides of the jar, cover loosely with a lid, plastic wrap, or a clean cloth, and place it in a warm spot (ideally 70-75°F or 21-24°C) in your kitchen. This initial mixture kickstarts the fermentation.
**Day 2: First Signs**
By day two, you might not see much activity, or you might notice a few tiny bubbles. The smell might be faintly yeasty or slightly sweet. Do not feed your starter today. Just give it a gentle stir, cover it again, and return it to its warm spot. This resting period allows the initial microbial activity to develop without interruption.
**Day 3: The First Feeding**
On day three, you should start to see more consistent bubbling and possibly a slight increase in volume. You might also notice a slightly sour or alcoholic smell. It’s time for the first feeding. Discard all but 50 grams (about 1/4 cup) of your starter. To the remaining 50 grams, add 50 grams whole wheat or rye flour and 50 grams lukewarm unchlorinated water. Mix well, scrape down the sides, cover loosely, and return to its warm spot. Discarding is crucial as it removes exhausted microbes and concentrates the beneficial ones, ensuring a healthy culture.
**Day 4-7: Regular Feedings and Observation**
Continue the feeding routine daily. Each day, discard all but 50 grams of starter, then feed it with 50 grams flour and 50 grams water. Around day 4 or 5, you might experience a dip in activity, which is normal – don't be discouraged! This is often referred to as the 'hooch' stage, where a dark liquid (hooch) might form on top, indicating your starter is hungry. Pour off the hooch, stir, and feed as usual. By day 6 or 7, your starter should be showing consistent signs of life: it will regularly double (or even triple) in size within 4-8 hours after feeding, exhibit numerous bubbles throughout, and smell pleasantly yeasty and tangy, like ripe fruit or yogurt. This consistent activity indicates a strong, active starter ready for baking. If it's not quite ready, simply continue the daily feeding routine until it shows these signs consistently. Remember, patience is key, and every starter develops at its own pace, influenced by ambient temperature and flour type. For more advanced techniques once your starter is established, consider exploring different types of flour for sourdough.
Troubleshooting Common Sourdough Starter Issues and Maintenance
Even with the best intentions, your sourdough starter might throw you a curveball. Knowing how to troubleshoot common issues is key to nurturing a long-lasting, active culture. One of the most frequent concerns is a *sluggish or inactive starter*. If your starter isn't bubbling or rising consistently after several days, consider the temperature. Starters thrive in warmth (70-75°F / 21-24°C). If your kitchen is cooler, find a warmer spot, like on top of the refrigerator, inside an oven with just the light on, or in a proofing box. Another reason for sluggishness can be insufficient feeding or an imbalance in the flour-to-water ratio. Ensure you're consistently using a kitchen scale for precise measurements and feeding at regular intervals, typically every 24 hours during the initial phase. Sometimes, a couple of consecutive feedings with whole wheat or rye flour can give a lagging starter the boost it needs due to their higher nutrient content.
Another common issue is *hooch*. This dark, watery liquid on top of your starter is a sign of hunger. While it's generally harmless, it indicates your starter has consumed all its food and is starting to go dormant. Simply pour off the hooch (don't stir it back in, as it can make your starter more acidic and less active), then feed your starter as usual. If your hooch is pink or orange, or if you see any fuzzy mold, discard the entire starter immediately and start over – these are signs of harmful bacteria. A healthy starter should smell pleasantly yeasty, tangy, or like ripe fruit; off-putting smells like nail polish remover or strong alcohol are usually just extreme hunger. A few feedings will often correct this.
Once your starter is active and mature, maintenance becomes simpler. If you bake frequently (several times a week), you can keep your starter at room temperature, feeding it daily. For less frequent baking (once a week or every few weeks), store your starter in the refrigerator. When stored cold, the metabolic activity slows down significantly, requiring less frequent feeding. Feed your starter once a week when refrigerated: take it out, let it come to room temperature for a few hours, discard most of it, feed it, let it sit at room temperature for 4-8 hours until active, then return it to the fridge. Always try to feed your starter at least 12-24 hours before you plan to bake with it, bringing it to room temperature and performing one or two regular feedings to ensure it's at peak activity. Remember, your starter is a living pet; it needs consistent care, but it's also remarkably resilient.
Comparison
Feature
Homemade Sourdough Starter
Commercial Active Dry Yeast
Commercial Instant Yeast
Leavening Agent
Wild yeast & lactic acid bacteria
Single strain of *Saccharomyces cerevisiae*
Single strain of *Saccharomyces cerevisiae*
Flavor Profile
Complex, tangy, slightly sour
Mild, yeasty
Mild, yeasty
Rise Time
Slower (4-12+ hours)
Faster (1-2 hours)
Fastest (30-60 mins)
Ingredients
Flour, water
Yeast, emulsifier
Yeast, ascorbic acid
Maintenance
Requires feeding & care
Store dry, no feeding
Store dry, no feeding
Nutritional Benefits
Improved digestibility, nutrient availability
Minimal
Minimal
Cost
Very low (flour & water)
Low
Low
Patience Required
High
Low
Low
What Readers Say
★★★★★
"This guide on how to make sourdough bread starter was a game-changer! I had tried before and failed, but the detailed day-by-day instructions really helped me understand what to look for. My starter is now super active and my first loaf was amazing."
Sarah J. · Austin, TX
★★★★★
"I followed this article's advice exactly, using whole wheat flour initially, and within 8 days I had a robust starter. The troubleshooting section was especially helpful when I saw some hooch for the first time. Highly recommend for beginners."
Michael D. · Portland, OR
★★★★★
"My family is now obsessed with homemade sourdough! Learning how to make sourdough bread starter from this guide was surprisingly easy. The detailed explanations about the science behind it made me feel more confident in the process, resulting in consistently great bread."
Emily R. · Chicago, IL
★★★★★
"The guide is very thorough and mostly excellent. I found the temperature recommendations a bit challenging to maintain in my cold kitchen, which slowed my starter down initially, but once I found a warm spot, it really took off. A solid resource overall."
David L. · Denver, CO
★★★★★
"As someone who bakes gluten-free, I adapted the flour types mentioned in this article and still found the principles for how to make sourdough bread starter incredibly useful. The daily observation tips were universally applicable and led to a very successful gluten-free starter."
Jessica M. · Miami, FL
Frequently Asked Questions
What is the best type of flour to use for starting sourdough?
For starting a sourdough culture, whole grain flours like whole wheat or rye are highly recommended. They contain more natural yeasts and bacteria in their bran, which provides a richer nutrient source and helps kickstart fermentation more effectively than refined flours. You can transition to unbleached all-purpose or bread flour once your starter is established.
My starter isn't bubbling; is it dead?
Not necessarily! A lack of bubbles doesn't always mean a dead starter, especially in the first few days. Common reasons for inactivity include a too-cold environment, inconsistent feeding, or using chlorinated water. Try moving it to a warmer spot (70-75°F), ensuring precise measurements, and using filtered water. Patience is key; it can take up to two weeks for a strong starter to develop.
How often should I feed my sourdough starter?
During the initial active development phase (first 7-14 days), you should feed your starter once every 24 hours. Once your starter is mature and active, if you keep it at room temperature, it needs daily feeding. If you store it in the refrigerator (for less frequent baking), you can feed it once a week. Always feed it 12-24 hours before you plan to bake.
Is it expensive to maintain a sourdough starter?
Maintaining a sourdough starter is incredibly inexpensive. The primary ingredients are just flour and water, which are staple pantry items. While there's an initial investment in a jar and possibly a kitchen scale, the ongoing cost is minimal compared to buying commercial yeast or artisanal bread. It's a very cost-effective way to produce delicious bread at home.
How does sourdough starter compare to commercial yeast?
Sourdough starter uses wild yeasts and lactic acid bacteria, resulting in a complex flavor, slower rise, and unique texture. Commercial yeast, typically *Saccharomyces cerevisiae*, is a single, cultivated strain that provides a faster, more predictable rise and a milder flavor. Sourdough also offers potential digestive benefits due to the fermentation process, which breaks down starches and gluten.
Who should consider making a sourdough starter?
Anyone interested in baking artisanal bread at home, those looking for a more natural leavening agent, or individuals who enjoy the process of cultivating a living food product should consider making a sourdough starter. It's perfect for home bakers who appreciate depth of flavor, a chewy texture, and the satisfaction of creating something truly from scratch.
Is there any risk of harmful bacteria growing in my sourdough starter?
While unlikely with proper care, there's a small risk. A healthy sourdough starter is acidic, which naturally inhibits most harmful bacteria. The main concern is mold. If you see any fuzzy, colored growth (black, green, pink, orange) on your starter, it indicates mold, and you should discard the entire batch and start fresh. A healthy starter should smell yeasty and tangy, not foul or putrid.
What are the future trends in sourdough baking?
Future trends in sourdough baking are likely to include an increasing interest in diverse grain starters (e.g., ancient grains), a focus on regional starter cultures reflecting local microbiomes, and the development of new techniques for integrating sourdough into a wider array of baked goods beyond traditional bread, such as pastries, cookies, and even fried foods.
Now that you have a comprehensive guide on how to make sourdough bread starter, there's nothing stopping you from beginning your own delicious journey. Embrace the process, be patient, and soon you'll be enjoying the unparalleled flavor and texture of homemade sourdough bread. Get started today and transform your baking!

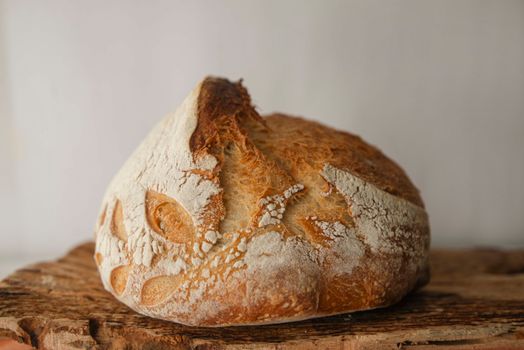 Photo: Natalia Olivera / Pexels